Gunaxin’s Baja Bug Build
Isn’t that the sexiest New Beetle you’ve ever seen? Behold Gunaxin’s Baja Bug Build, a project car we’ve been working on since early this year. Our goal was to have it ready for the Detroit Gambler 500, “a mostly off-road Rally-Style Navigational Adventure using cheap, impractical or fun vehicles.” Now that our build is complete, on Friday we’re driving it 550 miles northwest from Baltimore to Troy, MI to participate in that event with the Trail Trek Tour.
** UPDATE : Watch our Baja Bug in action at the Gambler 500 ***
We inherited our Gambler as a non-running 2000 Volkswagen Beetle GLS with 2.0 liter engine, 115 horsepower, and 4.2 inches of ground clearance. Then we did crazy things to it, in true Gambler style.
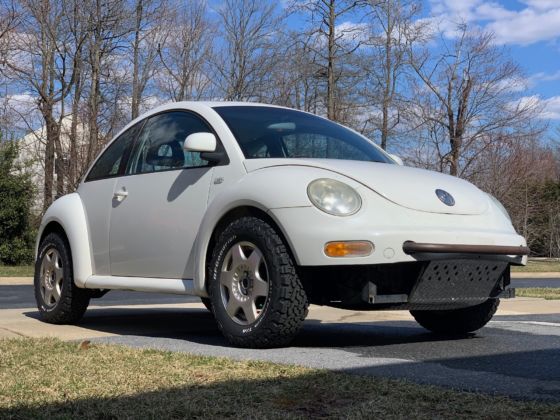
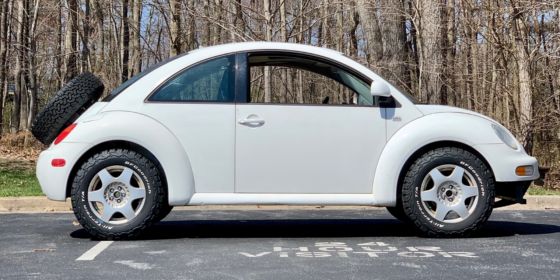
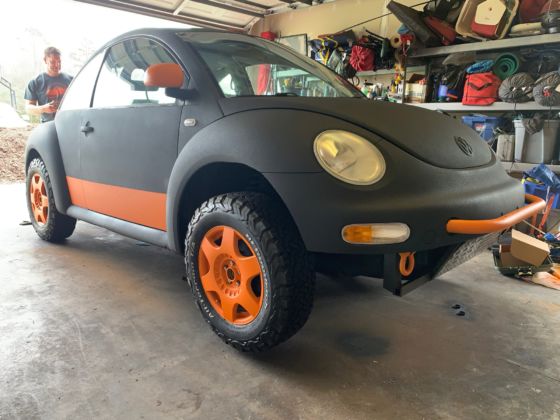
Now it’s a gorgeous Baja Bug with BFGoodrich All-Terrain KO2 Tires, tough Raptor paint job, skid plate, bull bar with off-road lights, rear mounted spare tire, and about 8.5 inches of ground clearance. While it still has a 2.0 liter engine that sends 115 horsepower to just the front wheels, at least it runs now!
This build was made possible thanks to our sponsors; Scepter, Raptor, BFGoodrich, and VWLiftkits.com. Our fun in Detroit will be fueled by a five gallon Scepter SmartControl gas can, just in case we run out of juice on the trails.
We broke the Baja Bug Build up into four phases and took plenty of photos to document the process along the way. Read on to see the stunning before and after comparison and everything that went into our Gambler 500 ready Baja Bug in our Project Photo Journal:
- Phase #1 : Resuscitate and Reliability
- Phase #2 : Lift and Tires
- Phase #3 : Cutting and Fabrication
- Phase #4 : Paint and Accessories
Phase #1 : Resuscitate and Reliability
Our 2000 Volkswagen Beetle had just 93,000 miles on it when we recovered it, but it had been sitting idle for over a year, and had been driven just 1,000 miles over the last decade. We were greeted with a dead battery, flat tires, broken serpentine belt, and a ton of sappy pine needles.
That cordless tire inflator, that our friends at Slime sent us, impressively made quick work of four flat tires on a single charge. After a car battery re-charge and a belt replacement, we were off to the car-wash to get a better idea of what condition this Beetle was in.
During the build we encountered a few other problems, most notably an overheating problem which caused us to replace a coolant flange, temperature censor, thermostat, water pump, and timing belt. After that repair, a coolant flush, and an oil change, our new Beetle was running reliably enough that we felt we could begin tackling the fun projects.
Phase #2 : Lift and Tires
The stock New Beetle has front-wheel-drive, 4.2 inches of ground clearance, and 24″ street tires. We knew we couldn’t do much about the FWD, so ground clearance and tires became our primary goals.
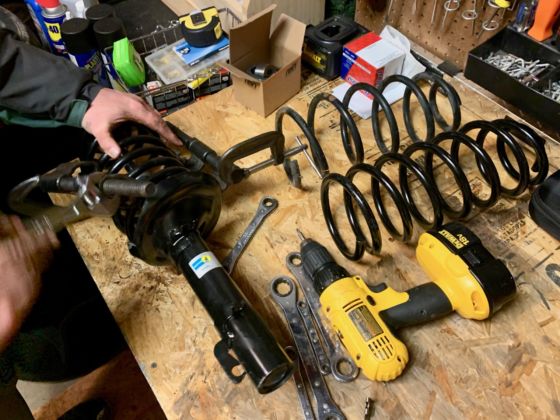
We added two inches of critical lift by utilizing a Stage 3 kit from VWLiftKits.com. They did all the work figuring out which shocks, struts and coils would work to upgrade the Beetle without affecting the camber, so that all we had to do was install them. You can see the difference in the original and replacement coils in the photos below, and the 1″ metal spacers that were utilized to help level out the ride.
We did this install in the dark, but it was relatively straight forward, and the impact on the ride quality was quite noticeable.
Below is the lifted Beetle before the new tires arrived. Ground Clearance was about 6.25″ at this point.
Nothing is more important for traction than a good set of tires, and we knew that our Baja Bug was going to need the best to be able to tackle the challenges of the Gambler 500. So we were delighted to score a set of the best all-terrain tires on the market from our friends at BFGoodrich. As you can see, we also went up substantially in size, with a 28″ KO2 tire replacing the stock 24″ tires, netting us an additional 2″ of lift.
The tires are size 215/70R16 and besides looking badass, they’re going to provide plenty of traction and sidewall toughness for our awaiting challenges.
Here you can see the tires installed, and that we don’t have a ton of clearance in the wheel well. That led to some hammering and trimming that we’ll discuss in the next phase of the project.
In order to widen the stance and keep the tires from rubbing internally, we utilized 17mm spacers that we picked up on Amazon.
Phase #3 : Cutting and Fabricating
In the 3rd phase, we wanted to trim the fenders to give the tires more clearance and prevent rubbing. We also wanted to protect the radiator, add a skid plate, a spare tire mount, and bull bar.
We began by removing the entire front fender assembly, which is plastic on the New Beetle. From there we cut straight across the bottom to remove the fog light assembly. Later we did some additional trimming on the wheel arch to prevent rubbing. Not pictured was some substantial hammering we did behind the front wheels to eliminate tire rub.
The next task was to protect the radiator which hangs down fairly low on the Beetle. Not only is it the leading edge, it was also essentially the lowest hanging point on the vehicle which is not a good combination.
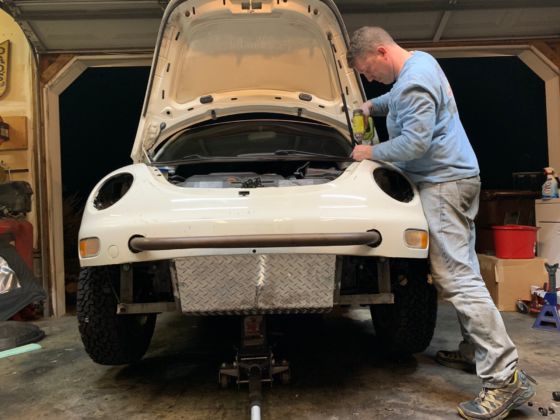
We built metal supports that comes down from the frame where the bumper attaches, and then spanned across with a metal bar to guard the radiator. We then welded some angled supports to the bumper, which would serve as additional reinforcement, and attachment points for the skid plate.
From here we decided to give the Beetle a thorough pressure washing, so it would be easier to work on. She was a dirty, dirty, girl.
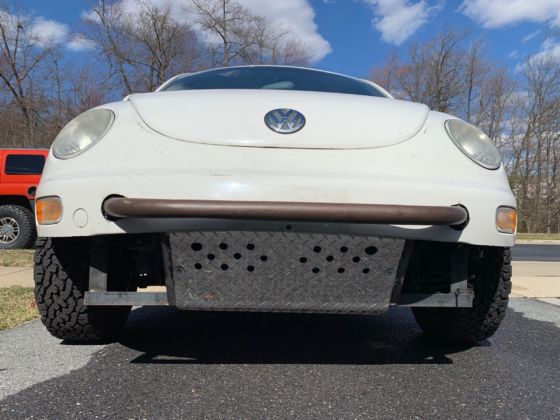
As you can see, the next step was installing a skid plate. We used a 2′ x 4′ sheet of diamond plate, and attached it underneath with some existing sub frame bolts (we purchased longer bolts and washers). From there the skid plate was bent to the front and attached to the angled supports from the last step. It’s held on with four bolts, and does need to be removed for oil changes.
Our next project was to create a bull bar for the front, utilized to mount a set of off-road lights (coming in future photos). We found an antique metal headboard for $10 and used the 2″ curved tubular piece at the top for the bull bar.
For this step, we drilled holes in the plastic fenders before re-attaching it, and then welded the bull bar to the bumper carefully through those plastic holes.
For air-flow to the radiator, we drilled some holes in the skid plate, although this early photograph doesn’t show them all.
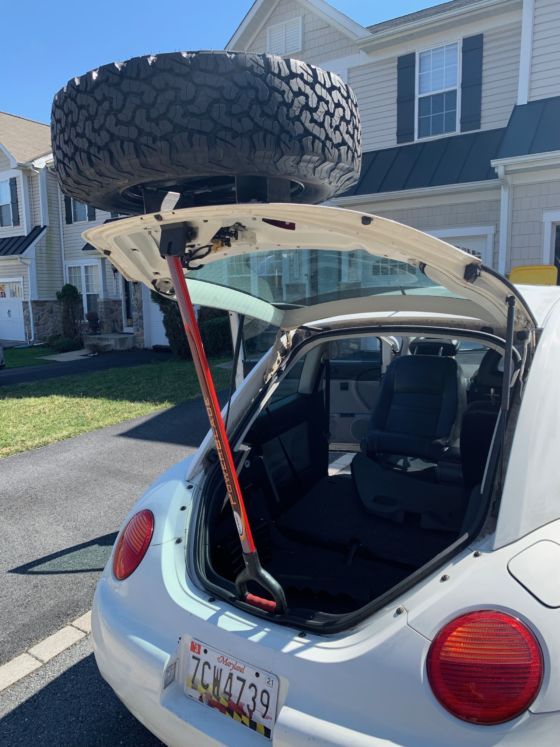
Our last fabrication project was to mount the spare tire. Through copious online research, we decided we didn’t like the look of other mounting options (Roof or some sort of bumper mounting bracket). Instead we opted to attach the spare directly to the rear hatch, and fabricated a custom bracket to handle it.
While it’s not the most practical solution, it puts the tire at a proper angle aesthetically, and certainly looks much better than the alternatives.
That side profile is so money now with the spare tire on there.
We utilize an old shovel handle as a prop-bar to hold the hatch up, which so far hasn’t been a problem. The hatch is however quite heavy to lift, so we avoid using the trunk and prefer loading and unloading from the front seats.
Phase #4 : Paint and Accessories
Our Baja Bug was starting to take shape, but a new paint job was just what we needed to really transform it. Thanks to our friends at U-POL, we received everything we needed to give the Beetle an ultra-tough coating of Raptor. Originally made as a Bed Liner, Raptor is a really popular coating for off-road vehicles to make them durable and scratch resistant.
The key here was plenty of prep work. We sanded the entire vehicle thoroughly, which helps to ensure proper adhesion. We then masked with paper and tape everything that we didn’t want to paint black, which included the areas we planned to paint orange. From there we utilized cans of acid etch primer for the metal areas, and adhesion promoter for the plastic areas
Mixing the Raptor was fairly easy, however once mixed you need to apply it fairly quickly, so you want to make sure everything is ready to go. For our black paint, this was no problem, but proved to be a bit of a challenge when we turned our attention to orange and small accessories. In retrospect, some smaller items would have been better to paint with regular spray paint.
An air compressor, professional application gun, and a bottle of black Raptor made fairly quick work of the Beetle. We did two thick coats of the black and used about four bottles.
We immediately removed any of our masking paper and tape to make sure we had nice clean lines. Below you can see the status after applying the black.
From there we covered up the black with sheets and utilized duct tape to help mask any detail areas so that we could apply the orange Raptor paint. It essentially works the same way, however they have tint-able bottles that you add the tint to while mixing.
This lighter color took a few more coats to get proper coverage, but the results were outstanding. Again we removed the masking promptly upon completing our painting. We let the vehicle dry overnight before remounting the wheels and some additional accessories.
Below you can see the wheels and our tow shackles (also painted with Raptor) that hang down from eye bolts through bumper mounting holes.
We utilized the existing fog light wiring to wire up a set of round LED off-road lights, which you can see mounted to the bull-bar below. We also utilized a regular can of black spray paint to paint the light mounting hardware, and the welded radiator protection bars around the skid plate.
Lastly, you can see our new third brake light, which became essential when we mounted the spare tire in front of the existing light.
While Raptor dries fairly quickly, it’s not supposed to get wet for 72 hours, so here you can see we pulled the Bug out into a field for some quick photos before the rain rolled in.
Finished Baja Bug Build
Above is the finished Baja Bug Build once the Raptor has fully cured, and below you can see the side profile with the hatch prop-bar. The height of the orange stripe and location of the orange bull bar were purposely chosen to match the height of the orange wheels and orange marker lights, to create a consistent orange line across the bottom of the Beetle. Those pieces combine well with orange accents on the side mirrors, tow shackles, and antenna. We decided to leave the skid-plate un-painted, which tonally works together with the headlights, off-road lights, side markers, lug nuts, lettering on tires, and sponsor stickers (photo below) as a third color (white / silver) on the vehicle.
The last detail was to add the logos of our sponsors, Scepter, Raptor, and BFGoodrich to the rear windows, and place our Trail Trek Tour magnet behind the doors.
Gunaxin’s Baja Bug is now ready to tackle the Detroit Gambler 500. Thanks to our sponsors and tons of hard work, it’s definitely much more capable than when we started and we can’t wait to see how it performs. Follow along on the hashtag #TrailTrekTour this weekend for updates.


